Curious how it all comes together? This section covers how it’s built and the tips we recommend for a smooth eBlaztr experience.

Dimensions
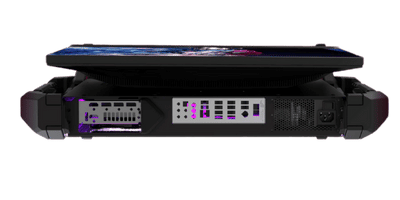
top view
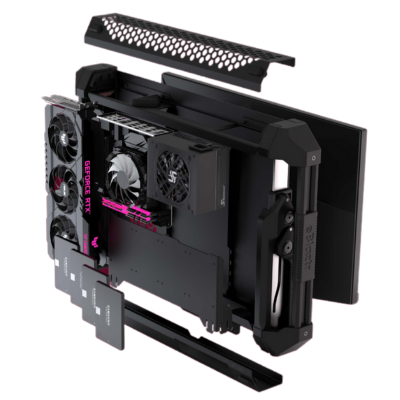
exploded view
replaceable Monitor
Step one: read the manual!
Yes, really — read the manual.
We know, nobody wants to… but this isn’t your average plug-and-play box.
eBlaztr is innovative, patented, and unlike anything you’ve built before.
Do yourself (and us) a favor — read it thoroughly before diving in.
You’ll thank us later.
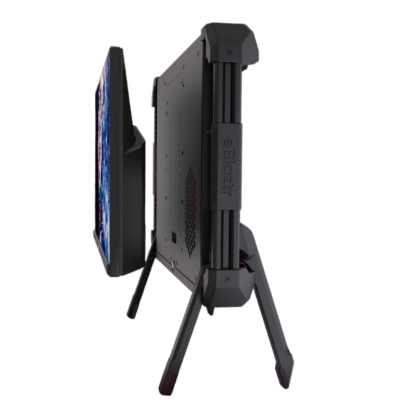
step two: play with the legsystem
The leg system? Built from scratch.
Because the system we wanted didn’t exist — so we invented one.
It’s designed to be:
✅ Ultra-fast to set up and pack down
✅ Height and tilt adjustable
✅ Lightweight enough for real-world transport
All of that, in one system.
But here’s the catch: it’s not your average tripod or stand.
That’s why there’s a manual — with a full walkthrough.
…You did read the manual, right?
Step 3: Hardware
At its core, every eBlaztr is built from four essential components:
🖥️ Monitor (25″)
🎮 Graphics Card (GPU)
🧠 Motherboard (with CPU and RAM)
⚡ Power Supply (SFX PSU)
That’s it. No fluff, no filler — just the critical hardware you need for serious performance, all packed into a portable, upgradable system.
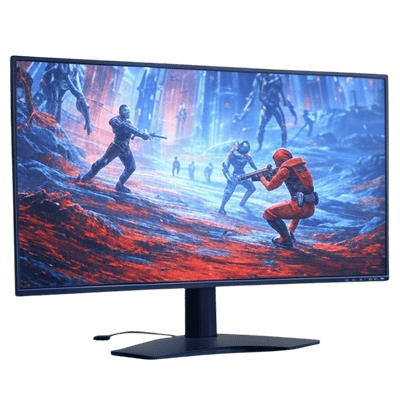
🖥️ Monitor Requirements for eBlaztr
To ensure full compatibility and a clean fit inside the eBlaztr, your monitor must meet the following requirements:
Max Size: 25 inches
VESA Mount: 100 x 100 mm
Power Supply: Internal PSU (no external power brick)
Connector Orientation: All ports (HDMI/DisplayPort and power) must point downwards
These specs are crucial for maintaining eBlaztr’s compact, portable design — while avoiding cable clutter and awkward fitment.
Double-check before you build, and you’ll save yourself a lot of hassle later.

🎮 GPU Requirements for eBlaztr
To fit and function properly inside the eBlaztr, your graphics card must meet the following specs:
Max Length: 330 mm (≈ 13 inches)
Max Width: 150 mm (≈ 5.9 inches)
Max Thickness: 70 mm (≈ 2.75 inches)
⚠️ Note: Some GPUs claim to be 70 mm thick but can be slightly larger due to shrouds or backplates. Please double-check dimensions carefully.Max Power (TDP): 300W
Choosing the right GPU ensures proper fit, airflow, and performance — no squeezing, no overheating, no surprises.
⚡ PSU Requirements for eBlaztr
Supported Form Factors:
SFX
SFX-L
Your PSU powers everything — and it’s often the most underestimated component in a build.
Make sure your power supply:
Matches your system’s total power draw
Is built with high-quality components
Comes from a reliable brand
Handling high wattage in a compact space isn’t the place to cut corners. That’s why we recommend Seasonic — a trusted name with a long-standing reputation for consistent, high-quality performance.
That said, other brands can work too — just be sure they meet the same standard of reliability. In a system like this, your PSU is not where you want to take risks.


🧠 Motherboard Requirements for eBlaztr
eBlaztr supports any brand, as long as the form factor is ITX — no exceptions here.
Cooler Height Limit: 57 mm (≈ 2.24 inches)
Make sure your CPU cooler not only fits physically, but can handle the thermal output (TDP) of your system.
RAM clearance is also key — low-profile modules are often the safest bet in compact builds.
This setup isn’t beginner-friendly, so if you’re diving in, make sure to check all measurements twice.
we aren’t deep diving into the variations of CPU’s and rams, and advise you to research these aspects yourself.
Step 4: Installation
🛠️ Installation Order
When assembling your eBlaztr, we recommend installing components in the following order for the smoothest experience:
Install the Monitor
Install the GPU
Install the PSU
Install the Motherboard
This sequence ensures proper access, cable routing, and mechanical clearance at every step.
Take your time — precision makes all the difference.
recommended built: how to Outperform any laptop
💻 eBlaztr vs. High-End Gaming Laptops
One of the things we genuinely enjoy showcasing at eBlaztr is how our system stacks up against top-tier gaming laptops.
While the benchmarks we reference are sourced from publicly available data and not gathered under controlled lab conditions, they serve as a solid indicator of what eBlaztr is capable of — especially when configured with premium hardware.
That said, this build isn’t our only configuration. In fact, one of the things we love most is seeing Frankenstein-style builds using older hardware — mixing and matching parts to squeeze out every last frame.
It’s not just fun — it’s smart. Repurposing parts you already own can dramatically cut costs and give new life to old components.
And here’s the kicker:
If you’re considering a high-end gaming laptop, there’s a good chance eBlaztr will deliver more power, more flexibility — and still save you money.
eBlaztr recommended built vs best performing laptop:
this is the performance you can expect from this built:

the best performing laptop as of april 25

tested in 3D Mark.
we have no relation to 3Dmark
🔧 Recommended eBlaztr Configuration
Want to get the most out of your eBlaztr build?
Here’s our hand-picked setup — tested for performance, thermals, and compatibility within the eBlaztr form factor:
-
🖥️ Monitor: AOC AGON PRO AG256FS — 24.5″, VESA 100×100, downward-facing ports
-
🎮 GPU: ASUS GeForce RTX 5070 Ti 16GB PRIME OC
-
⚡ PSU: Seasonic SPX 750 — reliable, efficient, and built for serious loads
-
🧠 Motherboard: Gigabyte B650I AX — AM5 socket, compact and feature-rich
-
🧬 RAM: G.Skill Trident Z5 Neo RGB DDR5-6000, 32GB (CL26, AMD EXPO)
-
🚀 M.2 SSD: Samsung 990 Pro 2TB — blazing fast storage for OS and games
-
❄️ Cooler: DeepCool AN400 BK — fits within the 57mm height limit and handles the heat
- 🎮 CPU: AMD Ryzen 7 9800X3D- together with it’s littlebrother 7800X3D Both delivers the best performance to TDP ratio in the premium category
This setup balances raw power, upgradability, and thermal control — all within the eBlaztr’s ultra-portable frame.
Whether you’re gaming, creating, or just building for the thrill of it — this config hits the sweet spot.
⚠️ Note for First-Time Builders:
This recommended setup is a great starting point — especially if you’re stepping into your first eBlaztr build and want a well-balanced, compatible configuration.
That said, we always encourage more experienced users to experiment, optimize, and build to their own preferences. There are real benefits to exploring different setups, depending on your use case.
For example, this build includes a 360Hz monitor — perfect for competitive gamers, but it might not be what you need. You could prioritize color accuracy, resolution, or budget instead.
There’s no single “perfect” build — just the perfect one for you.
Feel like building it yourself? Awesome. Not quite there yet? A trusted system integrator has your back — check out the “Where to Buy” section, for both options


